Customizing RISE
What to configure
Here’s a list of things that can be customized. See below for more details on how to implement those settings.
- presentation theme
- transiton between slides
- auto-launch presentation mode
- where to start the presentation
- automatic selection of cells
- slide sizes
- decoration (header/footer/background)
- vertical scrollbar
- chalkboard capabilities
- using a leap motion controller
- native
reveal.jssettings - custom CSS
- keyboard shortcuts
Choosing a theme
You can configure the theme of your presentation (which controls the
general look and feel of the presentation) with:
{
 ...
 "rise": {"theme": "sky"}
}
Choosing a transition
The transition configuration defines what happens in between slides:
{
 ...
 "rise": {"transition": "zoom"}
}
Automatically launch RISE
You can setup your notebook to start immediately with the slideshow
view using the autolaunch config option. This typically is very
helpful if you plan on publishing slideshows through something like
mybinder.org:
{
 ...
 "rise": {"autolaunch": true}
}
Choosing where the slideshow begins
The following configuration changes where the slides begin. By default, RISE will start at the selected slide. To have it start at the first slide instead, use this configuration:
{
 ...
 "rise": {"start_slideshow_at": "beginning"}
}
Select cells based on the current slide
As you progress into your slideshow, you either move to a new (sub)slide, or show (or hide) a new fragment; whenever any of these events occur, you may wish to have the jupyter selection keep in sync or not; this is the purpose of the auto-select feature.
There are currently two settings that let you change the way auto-select behaves, here are their default values:
{
 ...
 "rise": {"auto_select": "code",
          "auto_select_fragment": true}
}
auto_select can be any of:
code(the first code cell is auto-selected)none(no auto-selection)first(the first cell is auto-selected)
auto_select_fragment is a boolean that states whether auto-selection
should select cells based on the current slide as a whole (when set to
false) or restrict to the current fragment (when set to true, the
default).
These settings are experimental and may change in the future;
hopefully the current default behaviour is just fine. We might remove
auto_select_fragment as a setting altogether; we might also turn
auto_select into a mere boolean, since the current setting
auto_select = "first" has not proved of any practical value.
Regardless, it seems like the most meaningful combinations as of now
are either auto_select = "none" - in which case the other setting is
ignored, or auto_select = "code" and auto_select_fragment = true,
which now is the default.
Change the width and height of slides
To control the width and height of your slides, use the following configuration:
{
 ...
 "rise": {"width": "90%",
          "height": "90%"}
}
Notes
- remember that you can always use your browser’s shortcuts to zoom
in/out (
Cmd/Ctrl +andCmd/Ctrl -), and this way adjust the slide content to your screen/projector size. - this method is often preferable than setting sizes. In particular
it is dangerous to set sizes in pixels, as most often you cannot
rehearse with the actual projector. We recommend setting relative
sizes (in percents) rather than absolute ones (in
pxorcm). - in any case you may want to increase the slide height to ensure that cell outputs fit within a single slide; keep in mind that cell contents tend to take more space as you run your code.
Decorating all slides
RISE offers two levels for inserting a static background. You can either
- define
overlay, in which case you take full control, - or you can define
header,footerandbackimage.
So if you define overlay, the 3 latter options will be ignored.
overlay
It is possible to add the config option overlay to build a constant
background. It is wrapped in a<div>, so it can be text or html. In
this case, the user is entirely responsible for styling. For example:
{
 ...
 "rise": {
     "overlay": "<div class='myheader'><h2>my company</h2></div><div class='myfooter'><h2>the date</h2></div>"
 }
}
header, footer and backimage
As a more limited, but often more convenient alternative, you can define any of the following 3 settings.
In this case, minimal styling is applied (floor and ceiling), but user is still responsible for cosmetic styling:
{
 ...
 "rise": {
     "backimage": "mybackimage.png",
     "header": "<h1>Hello</h1>",
     "footer": "<h3>World!</h3>"
 }
}
You can see some examples using these options at
RISE/examples/overlay.ipynb and
`RISE/examples/header-footer.ipynb``, or in binder respectively
![]()
![]()
Enable a right scroll bar
To enable a right scroll bar when your content exceeds the slide vertical height, use the following configuration:
{
 ...
 "rise": {"scroll": true}
}
Enable chalkboard capabilities
Starting RISE 5.4.1, we provide some new chalkboard capabilities. To enable them, use the following configuration:
{
 ...
 "rise": {"enable_chalkboard": true}
}
When enabled, this plugin adds two buttons next to the help button. The first one provides you with a black board. The second one allows you to draw on top of the current slide.
It also reacts to the following additional keyboard commands:
[to turn the whole space into an empty chalkboard]to start adding free drawings to the current slide\to download chalkboard drawing=to reset chalkboard drawing on the current slide-to clear the chalkboard
Usage with Leap Motion
Reveal.js supports the Leap Motion controller. To control RISE slides with the Leap, put the reveal leap plugin options in your config with the following parameters:
{
 ...
 "rise": {
     "leap_motion": {
        "naturalSwipe"  : true,     # Invert swipe gestures
        "pointerOpacity": 0.5,      # Set pointer opacity to 0.5
        "pointerColor"  : "#d80000" # Red pointer"nat.png"
        }
    }
}
To disable it:
{
 ...
 "rise": {
     "leap_motion": "none"
 }
}
reveal.js configuration options
reveal.js offers a few configuration of its own, as described in
reveal.js’s documentation. Out of this
category, RISE will pass through the following settings:
controlsto enable or disable the lower right navigation arrowsprogressto enable or disable the thin progress bar at the bottom of the slideshowslideNumberthat allows you to turn off, or customize, slide numbers. Set to booleanfalseto turn off, seereveal.js’s doc for more details- as well as
history.
Adding custom CSS
RISE looks for two css files to apply CSS changes on top of the slideshow view:
- First, it attemps to load
rise.css, and hence this will be applied to all notebooks in the current directory; - Second, it attempts to load
the_notebook_name.cssand so this will hence be only applied tothe_notebook_name.ipynb.
Both files need to be placed alongside with the notebook of interest,
i.e. in the same directory. You can see some examples using this
customization with RISE/examples/showflow.ipynb.
NOTE. The implementation of this feature is rather rough, both css
files are blindly included without checking for their existence, which
may result in error messages in your browser console, complaining
about No such file or directory. These messages can be safely
ignored. See also https://github.com/damianavila/RISE/issues/353 about
this.
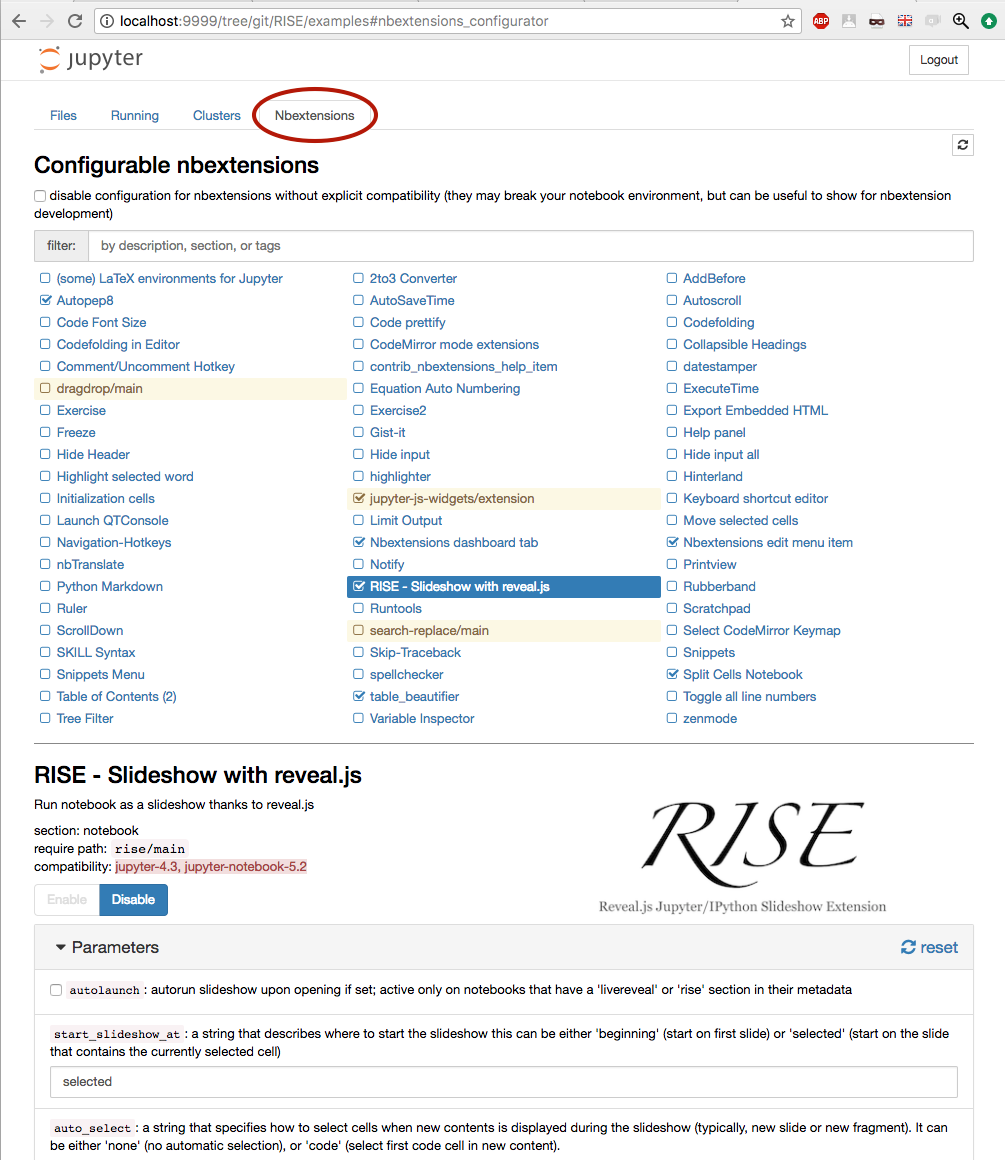
How to customize
RISE can be customized in a lot of ways. As of RISE version 5.3, you can:
- use
nbextensions_configurator; this tool offers an interactive way to enable, disable and tweak all notebook extensions - see screenshot below; - define settings in JSON files, typically by using python scripts;
- you can also embed settings in a specific notebook’s metadata;
- and you can also provide your own css file(s), that can supersede styling of the various DOM pieces.
The configurator
You may need to install and enable additional modules, refer to this github repo for more details on Jupyter notebook extensions.
In a nutshell:
pip3 install jupyter_contrib_nbextensions
jupyter contrib nbextension install
or
conda install -c conda-forge jupyter_nbextensions_configurator
You should then see a fourth tab in jupyter’s directory views, as depicted below. Settings are stored in JSON format, typically in
~/.jupyter/nbconfig/notebook.json
Using python
As an alternative way, you can tweak your local user’s settings with a
script rather than from the configurator. For example you can use
python like shown in this example below, that leverages the JSON config
manager from traitlets:
#!/usr/bin/env python3
from traitlets.config.manager import BaseJSONConfigManager
from pathlib import Path
path = Path.home() / ".jupyter" / "nbconfig"
cm = BaseJSONConfigManager(config_dir=str(path))
cm.update(
    "rise",
    {
        "theme": "sky",
        "transition": "zoom",
        "start_slideshow_at": "selected",
     }
)
Notes:
- the
config_dirparameter should point at where thenbconfigis located. This will vary depending on your setup, and specifically on where you “installed” and “enabled” the nbextension. - running the example above would result in the creation (or
modification) of a file named
~/.jupyter/rise.json, which is generally the right place to store user preferences, - to adjust this path to your own setup, you can use
jupyter --paths, and specifically theconfigsection, to see the path locations that are applicable. - for more information, see these docs:
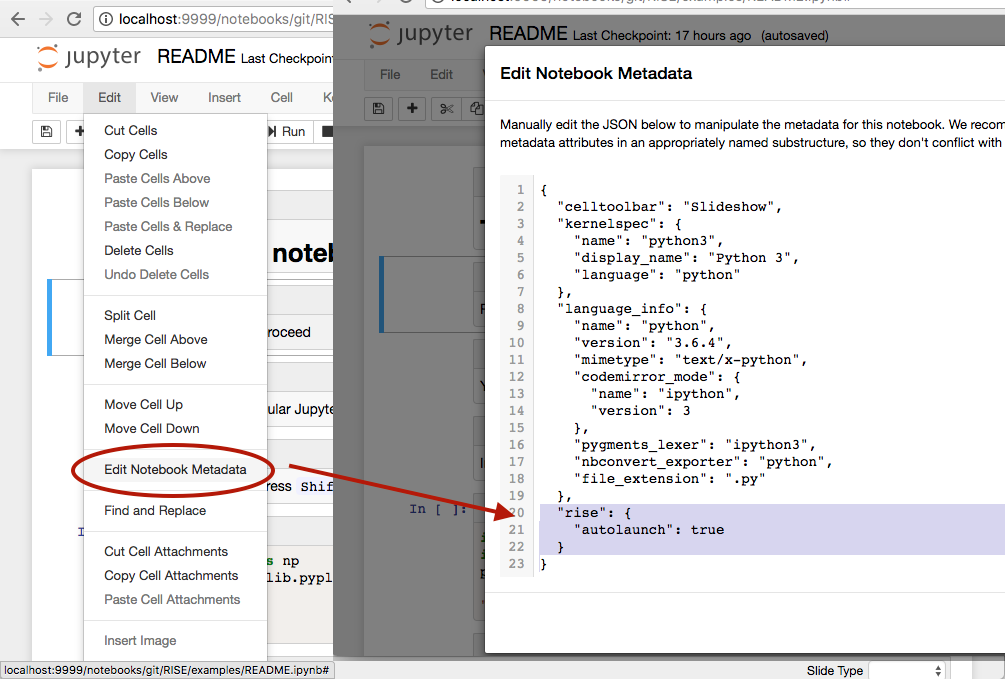
Notebook metadata
These settings can also be stored in your notebook metadata, which holds a JSON object, that can be edited through Jupyter’s standard menu (Edit → Edit Notebook Metadata); typically it would look like this:
{
    ...
    "rise": {
        "theme": "serif",
        "transition": "zoom",
        ...
    },
    ...
}
You can edit notebook metadata as follows
Note on legacy naming
For the remaining of this section, let us forget about custom CSS for a while, and concentrate on the first 3 configuration methods : configurator, JSON files, and notebook metadata.
In all this document we refer to settings stored in a JSON key or
filename rise. You may also see some notebooks using the
livereveal key instead, which is an older name for the same
project. FOr backward compatibility, both names are actually taken
into account, however you should know that rise will take precedence
on livereveal if the same setting in defined under both names.
You are encouraged to always use the rise naming as much as possible.
Order of precedence
The order of precedence between these 3 sources of configuration is as follows:
- a setting defined in the notebook’s metadata is always valid; among
these, as described above, settings in the
risecategory will override those defined inliverevealif both entries apply; - if still undefined, a setting defined in the configurator will be valid; Finally, the following priorities apply:
- if still undefined, a setting defined in any of the JSON files
considered by your jupyter server will be taken into account. Here
again,
rise.jsonsupersedeslivereveal.jsonin case of an overlap.
Apart from that, the scope of what is configurable through these various channels (configurator, JSON and metadata) is identical, so it is possible to use the configurator as some sort of an online reference manual, as it describes each and every setting.
Local setting vs hosted infrastructure
At this point you need to be aware that:
- settings changed through the configurator or JSON files - are stored on your own file system, typically in your home directory, and so are only be applicable to people using this notebook server; generally it is used for user preferences or such.
- a contrario settings embedded in a specific notebook’s metadata will be applicable to all users that get their hands on that notebook, even if they end up in a mybinder instance via github.
Keyboard shortcuts and Jupyter actions
Here are the Jupyter actions registered by RISE:
action name                key      behaviour
------------------------------------------------------
RISE:slideshow            alt-r  enter/exit RISE Slideshow
RISE:smart-exec                  execute cell, move to the next if on same slide
RISE:toggle-slide        shift-i (un)set current cell as a Slide cell
RISE:toggle-subslide     shift-b (un)set current cell as a Sub-slide cell
RISE:toggle-fragment     shift-g (un)set current cell as a Fragment cell
RISE:toggle-notes                (un)set current cell as a Notes cell
RISE:toggle-skip                 (un)set current cell as a Skip cell
RISE:render-all-cells            render all cells (all cells go to command mode)
RISE:edit-all-cells              edit all cells (all cells go to edit mode)
RISE:rise-nbconfigurator shift-c open the nbconfigurator pane in another tab
Some, but not all, come bound to default keyboard shortcuts. There are 2 ways you can change the bindings
Through JSON
Like the other settings described in this section, you can define shortcuts in JSON with e.g.
{
 ...
 "rise": {
     "shortcuts": {
         "slideshow": "alt-a",
         "edit-all-cells": "ctrl-e"
     }
}
With the above settings, RISE would not bind the default Alt-R
key to RISE:slideshow, but it would bind Alt-A instead. It would
also bind RISE:edit-all-cells to Ctrl-e.
Through custom.js
You can also use these actions in some regular javascript code,
typically your ~/.jupyter/custom/custom.js. Here is an example that
will attach one of these actions to a custom keyboard shortcut:
    define(
        ['base/js/namespace'],
        function(Jupyter) {

            let command_shortcuts = Jupyter.keyboard_manager.command_shortcuts;

            // set / unset the 'Slide' tag in slideshow metadata
            command_shortcuts.set_shortcut(
                'alt-a', 'RISE:slideshow');
        })
Note that with this approach, you will end up with the
RISE:slideshow action bound to both Alt-R and Alt-A.
Keyboard shortcut editors
The actions exposed to Jupyter are also present in Jupyter’s mainstream keyboard shortcuts editor, that you can use to (un)define your custom shortcuts.